
Monday, July 29, 2013
Oops
So this past June my troop went to Chief Logan Scout Reservation in southern Ohio. This was our first year at this camp since we usually went to the local one. One unusual thing about this camp was that we had to set up (and tear down for that matter) our own tents. The comissioners generously provided us with a hammer-like device to ram in the ground stakes: bowling pins. Yes, bowling pins. These unusal tools prooved invaluably usefull. Besides their obvious use, we found another. Our troop hasn't had our axes sharpened or serviced in a while, so we only brought a hatchet. This was not to be a barrier for pyrom...I mean industrious scouts. We collected many logs (too large of course) from the camp woodpile and brought them to the axe yard. The ensuing sight was one I wish I had pictures for and better words to describe the hilarity of the scene. In the axe yard, one scout would either lightly swing the hatchet into the log or else place it there while the other scout wound up with a bowling pin to smash the hatchet through the log. One such scout, who shall remain nameless, was particularly good at this, smashing many logs and even more bowling pins. But, alas it was all for nought, because on the day before we left, this same scout managed to lodge the hatchet into a knot in this log. After repeated attempts to remoove it, we gave up. In the process though, we bent the handle ( bent it back later) and ruined the hatchet for all future use. Oops. Oh well. It cleaned up nicely for a trophy. Sadly, we haven't had a meeting in sometime now and I haven't been able to get it to the scout master. I hope he likes it, but until then I'll enjoy it. Not sure what type of wood it is. Maple maybe? If you know, please let me know.
 The computer doesn't seem to want me to post the other close up shots, but I'll try again.
With This Ring...
So now every guy including me has to step it up a notch for our future wives. I have no idea how to top this. I'll come up with something. http://imgur.com/a/ZjCaW#0 He goes through the whole process in the album.
Friday, July 26, 2013
A Smith's Hammer
Every smith has to have a hammer. Some have many. I have a few. This is my favorite for many reasons. I bought it at an antique mall just before last school year. It had a too short handle and I knew it needed a better one. I took off the handle and carved out this one. I'm not sure what type of wood it it, but I love it. The handle is a rounded rectangled to fit in my hand. I've added shims to keep the head in place. I don't know the weight, but it doesn't matter. As a smith uses his hammer, it begins to become part of him. I even carved in a pinwheel for kicks and giggles. I really love this thing. It's just amazing.


Thursday, July 25, 2013
So Close, Yet So Far
This is not my first attempt to cast a definitive shape, but this one has a lot of hopes riding on it. Unfortunately, the hopes were dashed when I saw that the metal was not pouring correctly. Tonight I cast (or tried to) a ring in 60/40 solder. All was well, or so I thought. The metal melted according to plan. The model was cast into the plaster. The beeswax had melted out of the cavity... mostly. That was my downfall. The wax had not all melted out and about half of the ring model was left in the cavity. When the molten metal poured into the mold, the wax absorbed the energy of the solder to melt it and then it cooled too early. Attempts to remelt the metal in the spout resulted in over spill and melting the brass pour spout. I have learned and soon, very soon shall try again. I just need to remelt my wax shavings and carve another model. It will take a few days. I shall succeed...


The brass bit is the spout that is stuck and needs to be melted off. the surface finish is exactly as found except for some scratching from my knife cleaning off the plaster.


The brass bit is the spout that is stuck and needs to be melted off. the surface finish is exactly as found except for some scratching from my knife cleaning off the plaster.
Wednesday, July 24, 2013
None Shall Pass
This was a fun four day project. I love woodworking. Whether I'm using power tools or hand tools, wood is a joy to work. I learned quite a bit about cutting and forming on this piece. I made some fits too loose so I had the shim them and other places were too tight and I had to fill the gaps. You can see my terrible filling and joining jobs at the hilt especially. The main piece, blade and tang, are pacific northwest cedar. The reinforcement, crossguard, and grips are white oak. The pommel is also cedar. Most of it was just glued together. The pommel, for reasons of the integrity and quality of the cedar, was pinned, form fitted very tightly, and then glued. It was finished in amber shellac and then coated in polyurethane.


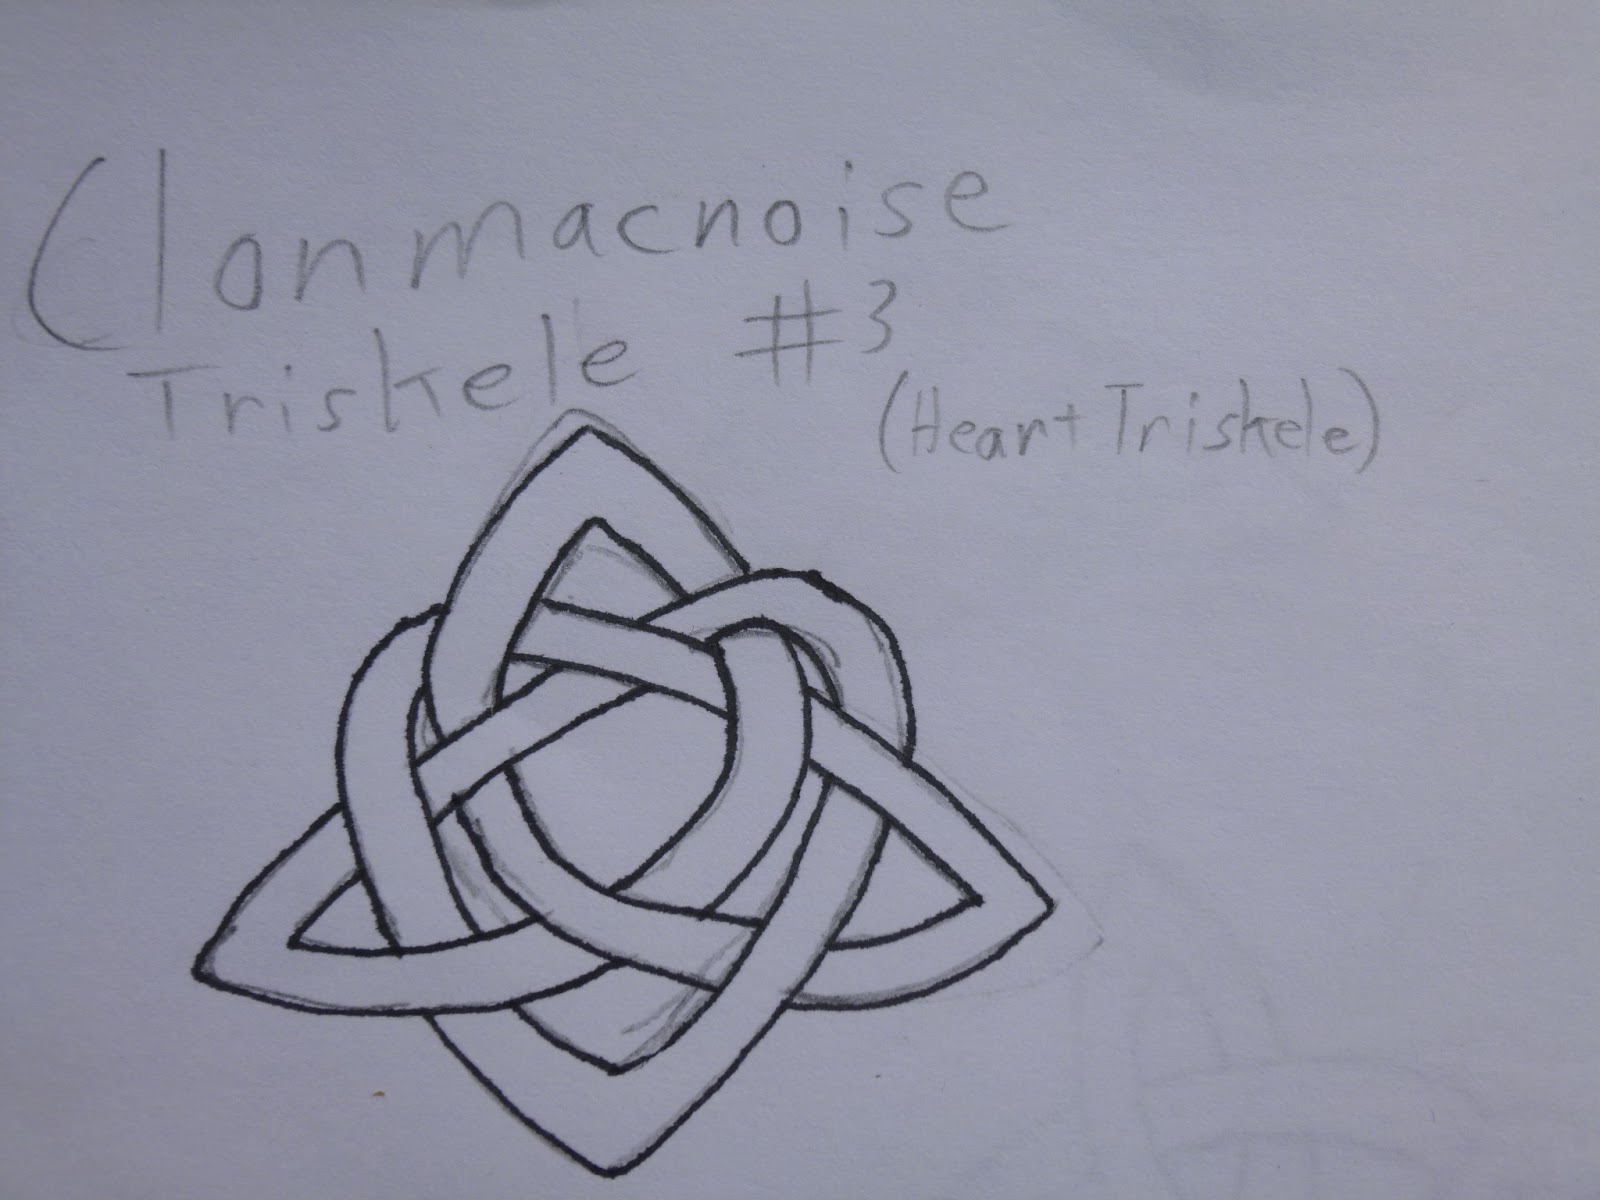
Tuesday, July 23, 2013
A Boy Scout Practicing His Knots
Celtic knots that is. Celtic Knot work dates back as far as the 400s, though earlier simpler symbols existed in celtic and roman culture well before Christ. These knots have taken on a variety of meanings. The simplest and most recognizable is the triskele or trinity knot. These triangular knots had countless variations and have been observed in Pictish, Welsh, Gaelic, and Saxon art. Their use in Christianity would repesent the Holy Trinity. Another common knot was the love knot. These could very complicated or as simple as the one I have done. They typically have one strand and involve a heart in the design. The heart was for love and the single strand meant a single, unified life as man and woman. The small section of unfinished knot is a border. These are commonly found on manuscripts like the Books of Kells as illuminations in the margins or title pages. Since monks had to had copy all the pages of books down onto expensive animal skins, they figured, might as well make it worth the time and money. If you haven't seen an illuminated manuscript, I highly recommend it; they are beautiful. All these knots I learned yesterday, online at http://www.youtube.com/user/TheCelticGoldsmith?feature=mhsn. The Celtic Goldsmith is his youtube username, but his real name is Jason Bellchamber. He is a custom goldsmith specializing in Celtic, Native American, and Norse art. Check out his work here http://www.bellchamber.net/.


 This last one is the spreadsheet of all the ideas I had about a pocket knife I want to make. I started the initial forging the other day, but still have a lot to do. Wish me luck!


Friday, July 19, 2013
That's Not a Knife!
So I've been toying around with metal since I was twelve, but this past school year and last summer I really got into it. These are finished works I've been making for myself and whatnaught. I really have no clue what I'm doing. Besides researching the living daylights out of the internet, I decided to go abeating. It wasn't pretty. Maybe I'll post that someday.... somewhere...over the rainbow. These two are brothers in that they where once from the same tool. I'm not sure what the tool was, some kind of shear for watch bands, but when my dad handed it to me, I knew I'd struck gold...err steel. It was high carbon tool steel. Everything up to this point had been just mild or low carbon and that was fine for practicing, but I needed a real knife. So I cut up the steel and forged it out. I like the way the shot one feels in my hand, but I love the way the other one looks and cuts. I hope you enjoy it. I'll get some more up soon.


Subscribe to:
Posts (Atom)